
DJANGO is an open source and free Python Web framework. Framework is a library of reusable modules. It defines a structure for our application.
There are lots of popular websites built with Django such as Instagram, Youtube, Pinterest. For more information about popular websites, click here!
NOW IT'S PROJECT TIME !
Creating Django Project
Create a python project.
Install django library.
Pip install django==2.1
Create a django project.
Django-admin startproject pyshop .
Run development web server.
Python manage.py runserver
Creating Apps
Apps are functional areas in our project like “product management” or “customer management”. Each app is a python package.
Create an app package
Python manage.py startapp products
We created a package called “products”. We’ll use this app as our product management function.
Creating Views For Apps
View is basically a function that gets called by Django when the user navigates to a particular page. How it works:
We navigate to a page “.../products”
Our browser sends an http request to our web server
Django takes this request and sends it to our view function
In this request, we can find information about the client
Define what the user will see on the “Views” file. Simply we define a function.

URL Mapping
Django doesn’t know that it should call the “index” function when we send a request to “/products”. We need to map “(URL) /products” --> “(FUNCTION) index”. It's called “URL Mapping”!
URL means “Uniform Resource Locator” and basically “Address”.
Create a “urls.py” file in the app package. Naming is important, urls is a convention in Django. We need to follow this convention to structure our project.
Define “urlpatterns” variable in urls file. It's also a convention.
Map the function to the corresponding URL. Use “urls.py” module in our products app.
/products --> index: We remove the root of the url “/products”.

path('', views.index)
In the last part, we need to tell Django about our app “products”. Up to this point, Django is not aware of this app. Edit “urls.py” in our pyshop project and map it to the app's url.
path('products/', include('products.urls'))
Creating Models For Apps
Models are a representation of a real world concept. In an online shop like customer, order, shopping card etc.
Define a class in our app’s “model.py” module.
class Products(models.Model): We inherit our class from the model class and our class will have all the capabilities such as storing in a db, reading from a db etc.
Define its attributes.
name = models.CharField(max_length=255)
price = models.FloatField()
stock = models.IntegerField()
image_url = models.CharField(msx_length=2083)
Migrations
We can associate our models with databases.
Download sqlite.
db browser for sqlite
Drag and drop the .sqlite3 file in our project into sqlite.
Django automatically creates tables from models.
In the beginning, we need to do settings so django will recognize our app. Open settings.py file in project and edit INSTALLED_APPS.
INSTALLED_APPS = [
'django.contrib.admin',
'django.contrib.auth',
'django.contrib.contenttypes',
'django.contrib.sessions',
'django.contrib.messages',
'django.contrib.staticfiles',
'products.apps.ProductsConfig'
]
Open terminal and run the command below. It will create a migration and the tables.
python manage.py makemigrations
To generate our table, run the command below:
python manage.py migrate
When we want to add/modify any table in db:
Edit models.py file in app (create class etc.)
Only execute 3.b and 3.c commands:
python manage.py makemigrations
python manage.py migrate
Admin
Django comes with an administrative panel by default. We can work with this panel.
Create the first user (super user).
python manage.py createsuperuser
Create username, email and password for the user
After registration with the user, here is our administrative panel. We can manage users and groups.

We can manage our product app from the admin panel. In our product app, open admin.py module. We’ll register the models that we need to manage in the admin section.
from .models import Product
admin.site.register(Product)

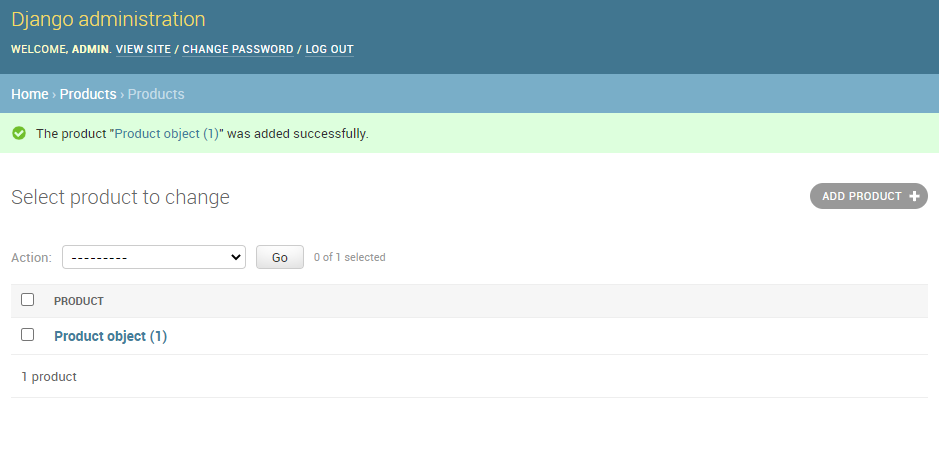
We can add a new product (ex. orange) by using Add in our admin panel.
Customizing The Admin
We can customize our product table in the admin area.
In our product app, open admin.py module and create a new class. We inherit it from the ModelAdmin class to use its default methods. Class name is important, “Modelname+Admin” is the convention.
class ProductAdmin(admin.ModelAdmin):
list_display = ('name', 'price', 'stock')
Edit registration configuration.
admin.site.register(Product, ProductAdmin)

Templates
We’ll edit our product page and list the products. We’ll get the products stored in the database and format them using some html template.
Open “views.py” in our product app.
Get all products.
def index(request):
products = Product.object.all() # to get all products in table
# Product.object.filter() to filter ex. cheaper than 2 dollars
# Product.object.get() to get one product
# Product.object.save()
Represent products with an html template. Create a directory named as “templates” in the app. Naming is important because Django will look for “templates”.
To create a template for index function, create an “index.html” file in the templates directory. There are 2 special syntaxes in Django:
{% : We use it to dynamically execute logic such as for loops and if statements. It’s called “template tag”.
{{ : We use it to dynamically render values in our html markup.
For the last step, change the return of index function in the views module.
# return HttpResponse('Welcome to Products Page')
return render(request, 'index.html', {'products': products})

Adding Bootstrap
Bootstrap is a potent front-end framework used to create modern websites and web apps. It's open-source and free to use, yet features numerous HTML and CSS templates for UI interface elements such as buttons and forms.
We’ll create a base.html file and make our page more modern. We’ll use the website below to copy some starter templates.

Create a “base.html” in our app and copy the starter template code.
Edit “index.html” file and extend it from base.html.
{% extends 'base.html' %}
After bootstrap, our page will look more tidy and clean.
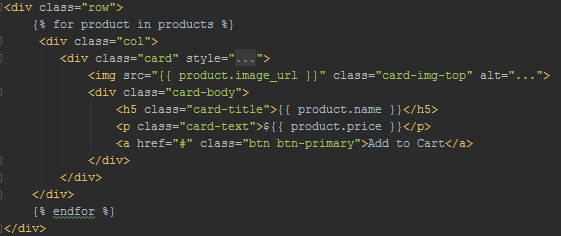
Rendering Cards
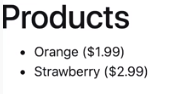
Now, we’ll make product cards and get rid of the bullet points!
We’ll use Bootstrap’s cards.

Final Touches
For the final, we’ll add a navigation bar and padding to our website. Padding is the space between the web element (text, image, buttons, etc…) and the border of that element.
Move “base.html” to the project. Because it’s in our app now and this means, we can only use it in our app. We’ll have many more apps in a real life application so we need to move the base template to the center of the project.
Add padding to the index page. Before padding:

Add navbar to the index page from “https://getbootstrap.com/docs/4.5/components/navbar/”.

After adding navigation bar and padding, here it’s the final page we built:
